


Configure SHONiR CMS with CodeIgniter 4 on Localhost – Complete Installation Guide
How to Configure SHONiR CMS with CodeIgniter 4 on Localhost
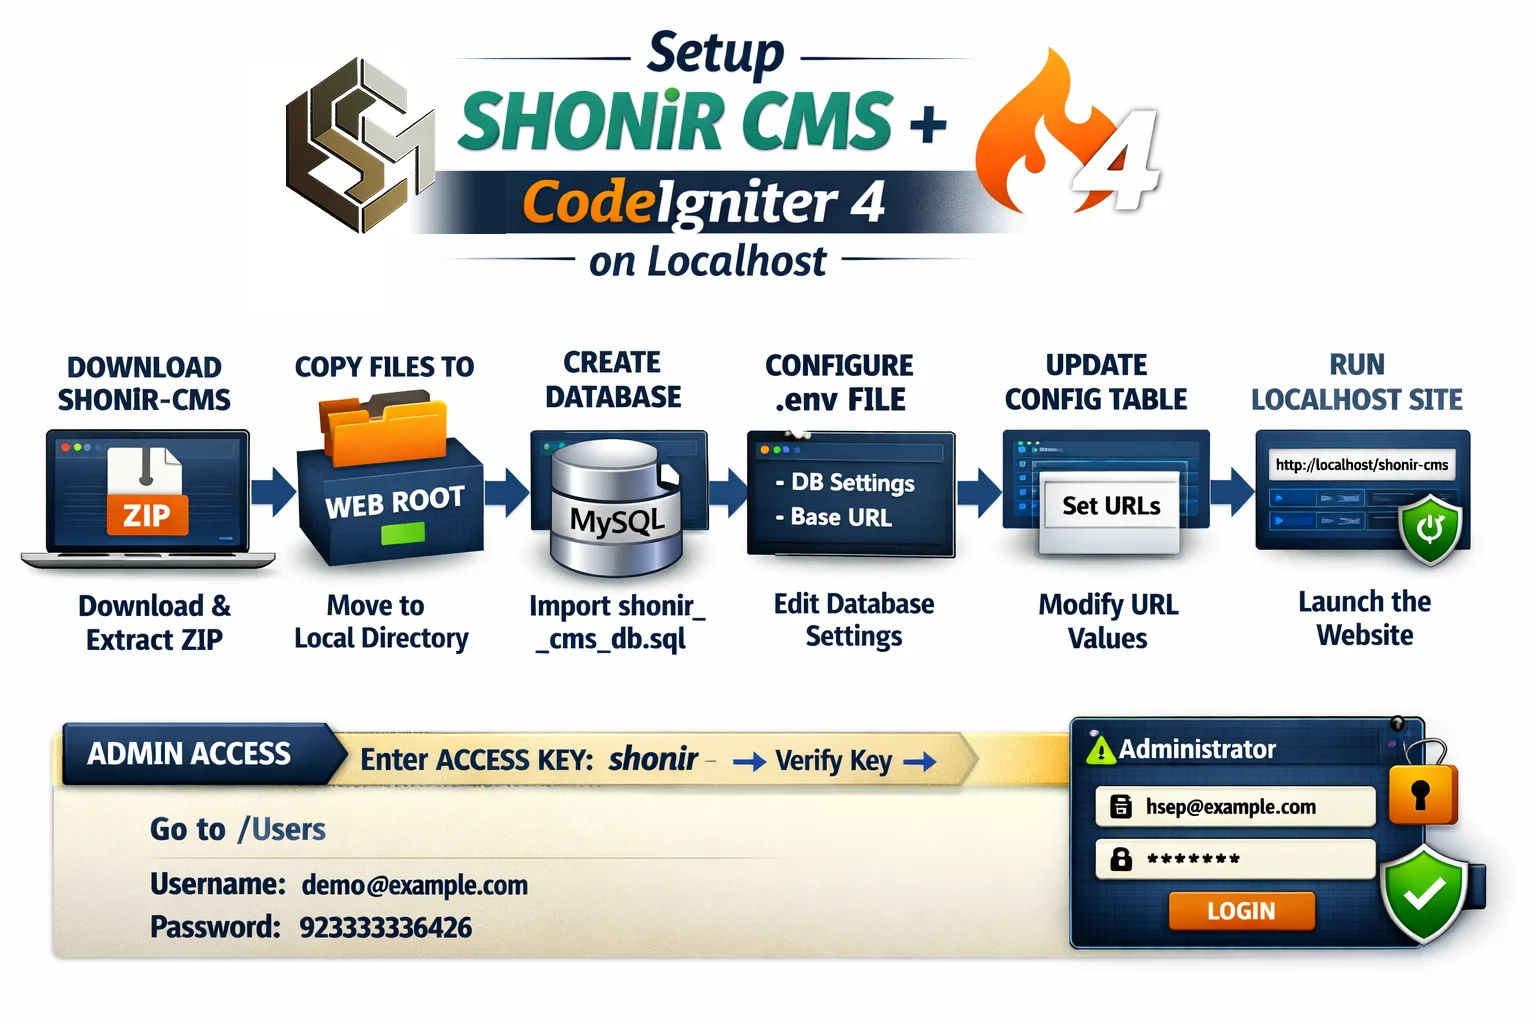
This guide explains how to install and configure SHONiR CMS on localhost using CodeIgniter 4. You will download the CMS from GitHub, configure the database, and run the website on your local server.
1. Download SHONiR CMS
Open Google and search for shonir cms. You will see the GitHub repository link.
You can also go directly to the repository:
https://github.com/shonirits/SHONiR-CMS
- Click the green Code button.
- Click Download ZIP.
- The file SHONiR-CMS-master.zip will be downloaded.
2. Extract the ZIP File
Extract the ZIP file using any archive software such as WinRAR or 7-Zip.
After extraction open the folder SHONiR-CMS-master.
The folder contains the following structure.
Folders
app
db
etc
public
vendor
writable
Files
.env
.htaccess
README.md
composer.json
composer.lock
favicon.ico
index.php
license.txt
robots.txt
3. Move Files to Local Server
Go to your local web server root folder.
Example locations:
WAMP:  C:\wamp64\www\
XAMPP: C:\xampp\htdocs\
Create a new folder named:
shonir-cms
Copy all files and folders from SHONiR-CMS-master and paste them inside the new folder.
4. Create Database
Open phpMyAdmin in your browser.
http://localhost/phpmyadmin
- Create a new database named shonir_cms_db.
- Select the database.
- Click Import.
- Select the file:
db/shonir_cms_db.sql
Click Import to create the database tables.
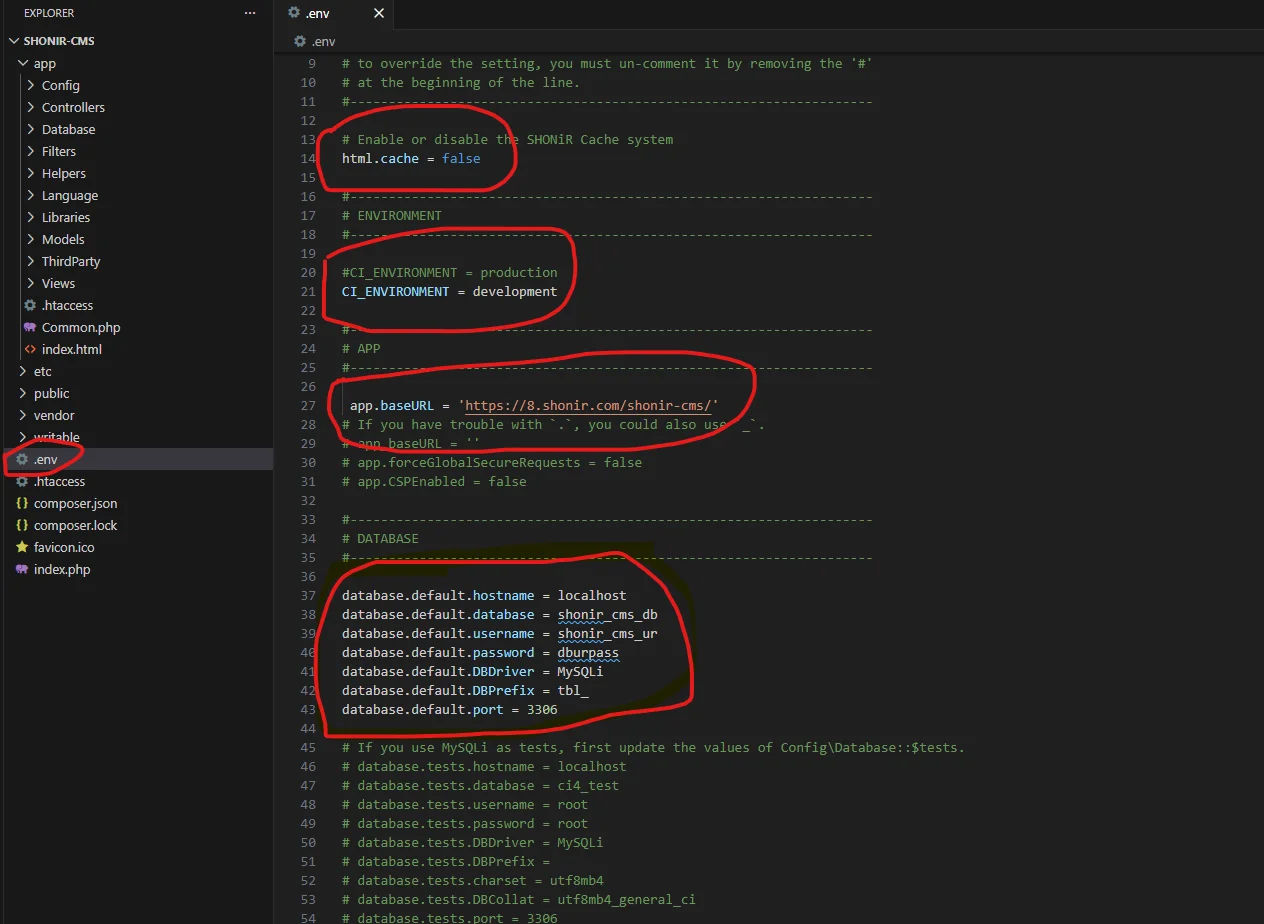
5. Configure the .env File
Open the .env file in your preferred editor such as VS Code or Notepad.
Default database configuration:
database.default.hostname = localhost
database.default.database = shonir_cms_db
database.default.username = shonir_cms_ur
database.default.password = dburpass
database.default.DBDriver = MySQLi
database.default.DBPrefix = tbl_
database.default.port = 3306
Example localhost configuration:
database.default.hostname = localhost
database.default.database = shonir_cms_db
database.default.username = root
database.default.password =
database.default.DBDriver = MySQLi
database.default.DBPrefix = tbl_
database.default.port = 3306
6. Configure Base URL
Find the following line in the .env file:
app.baseURL = 'https://8.shonir.com/shonir-cms/'
Change it to your localhost path.
app.baseURL = 'http://localhost/shonir-cms/'
7. Configure Application Environment
The environment setting is:
CI_ENVIRONMENT = development
Available options:
development
production
testing
For localhost keep it set to development.
Learn more:
https://codeigniter.com/user_guide/installation/running.html
8. Update URLs in Database
Open phpMyAdmin and select the table:
configure
Go to the Search tab and search for url in the column:
config_key
Update the values to match your base URL:
http://localhost/shonir-cms/
Update the following configuration keys:
assets_url
uploads_url
img_url
base_url
css_url
js_url
cdn_url
9. CDN Configuration
Learn more about CDN configuration:
https://8.shonir.com/shonir-cms/bpd17/multi-cdn-guide-boost-website-speed-performance.html
10. Open the Website
Open your browser and visit:
http://localhost/shonir-cms/
11. Fix Demo Website Links
If links redirect to the demo website, delete cache files.
Go to:
writable/cache/
Delete all files and folders inside the cache directory and refresh the browser.
Learn more about caching:
12. Access the Admin Panel
Open the admin login page:
http://localhost/shonir-cms/Users
Enter the access key:
shonir
Then enter the captcha code shown in the image.
Login credentials:
Username: [email protected]
Password: 923333336426
Video Tutorial
For convenience, a video tutorial is also available on YouTube and Dailymotion.
YouTube
Dailymotion
#SHONiRCMS , #CodeIgniter4 , #PHPCMS , #OpenSourceCMS , #WebDevelopment , #PHPDevelopment , #CMSInstallation , #GitHubProjects , #MySQLDatabase , #WampServer , #XAMPP , #CodeIgniter
Recently Reading

Multiple SMTP Servers with Relay Limits & Smart Failover
Shonir CMS introduces a powerful Mail Servers management system in its admin panel, allowing administrators to configure multiple SMTP servers for email delivery. This feature ensures flexibility, reliability, and scalability when sending transactional or bulk emails.
 Mian Shoaib

The Powerfully Fast, CodeIgniter 4 Based Open-Source CMS
Discover the powerful features of SHONiR CMS including unlimited pages, categories, items, banners, blog management, and full SEO optimization. Open-source release coming March 17, 2026.
Mian Shoaib

SHONiR CMS – Lightning Fast, Open Source, Ultra Efficient
Discover how SHONiR CMS delivers ultra-fast performance using PHP 8 and MariaDB 10 on a single-core 1GB VPS server — handling 100K+ requests without slowing down.
Mian Shoaib
© 2026 SHONiR CMS . All Rights Reserved.